 WebAssist Pro Maps for Google is a new extension from WebAssist that makes adding interactive Google maps a snap in Dreamweaver. The extension is installed via the extension manager, and adds a menu option for easy access to the extension. This Pro Maps for Google review takes a look at the functionality provided by this WebAssist extension and how it can save a ton of time integrating Google maps into a website.
If you’ve every tried to integrate the Google maps API into a website, you know there is a lot of power and functionality that can be integrated, but harnessing the power of the plugin can be difficult. WebAssist’s Pro Maps for Google Dreamweaver extension makes incorporating an interactive map as easy as running a wizard, setting a few options, and clicking a button. The wizard automatically generates the scripts and PHP files needed for your website, and all you need to do is upload those files to your web server.
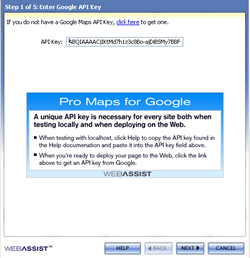
Step 1: Enter your Google Maps API Key
 When you run the Pro Maps for Google wizard, you are first presented with a wizard dialog prompting for your Google Maps API Key. This can be obtained once you have signed up to use Google Maps, and is unique to each site you wish to use the maps on. In your API key request, you can specify your root domain such as exampledomain.com or a specific folder-level address such as exampledomain.com/addresses.
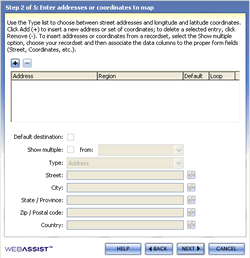
Step 2: Enter your Address Information
 Once you have entered your API key, the next step in the wizard is to enter your address information. The power of WebAssist Google Pro Maps lies in the ability to dynamically generate Google maps dynamically from a database recordset. Your database fields need to be structured to fit the required API fields, including street addres, city, state, zip code and optional country code. If all your addresses will come from the same country, you can hard code the country field and not use a recordset field. You can also indicate a default destination address which appears in the event that Google cannot geocode your dynamic address information. There is also an option to show multiple addresses within the same map window simply by checking a box.
Step 3: Customize your Google Map Presentation
 The next step in inserting your Google Pro Map is to customize the map to your liking. This is another feature of WebAssist Google Pro Maps that save alot of time and effort. Combing through the Google maps documentation on how to customize your map is not the best way to spend your afternoon. The wizard takes care of it for you! You can select the type of address marker such as flat, pillow, house, pin, push-pin or star. Selectable color schemes are the next option, with a color that will fit about any website scheme. Finally, another big time-saver, the ability to change the text displayed in the info window. You can use the dynamic recordset fields, or insert static text as you wish. You can also include some HTML tags such as bold, italics, colors, etc. to stylize the info window text.
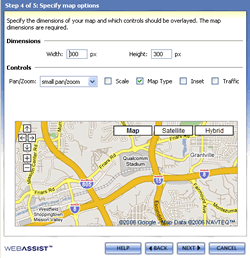
Step 4: Choose Map Size and Control Features
 The next-to-last step in creating your Google Pro Maps interative map is to specify the size of the map within your web page. Simply set the width and height dimensions (in pixels). Control options include pan/zoom controls of a small control, large control or just a zoom control without panning ability. You then select if you want a scale indicator, and whether your want a map view, satellite view or a hybrid map overlay on the satellite imagery. You can include a map inset, which shows a small thumbnail image in the lower right corner of a larger section of map, and also whether you want to show traffic information on your map.
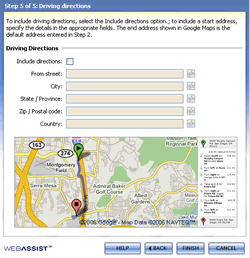
Step 5: Include Optional Driving Directions
 The final step in the WebAssist Google Pro Maps wizard is the option to include interactive driving directions on your map. You can either input a static location from which to provide driving directions, or you can specify form fields that supply the dynamic data needed to generate the dynamic driving directions. The map will appropriately display the start and end points on the map, as well as text directions and mileage indications for how to navigate to the location. Another very useful included feature of the WebAssist Google Pro Maps extension.
Once you click the “Finish” button, the Google Pro Maps extension will generate all the needed code to implement your final map. There is a small script file as well as a couple of code files that will be saved into your local site. These are the only files that require upload to your remote server. Once you upload and preview your site, your map will be visible and ready for use by your web visitors.
WebAssist Google Pro Maps Review Comments
I have used this extension quite frequently and have been very pleased with the results. You can very easily style the final map using CSS, and you can always go back into the wizard and make changes to your map. I spent the better part of a day trying to decipher the Google Maps API documentation when I was trying to code dynamic maps for a site, and then I found WebAssist Google Pro Maps. In a matter of minutes, I had created the maps I had spent a day trying to code by hand. The flexibility and options provided make this a great Dreamweaver extension to have in your toolbox.
WebAssist extensions are very well documented and their website provides excellent Flash tutorials on how to implement Google Pro Maps. Their support forums are well monitored and you can get excellent advice and ideas from other users on the forums. I highly recommend checking out WebAssist Google Pro Maps or their other extensions that simplify coding PHP and ASP sites in Dreamweaver.